Get Guidelines to Fix the Tap Windows Adapter V9 Issue

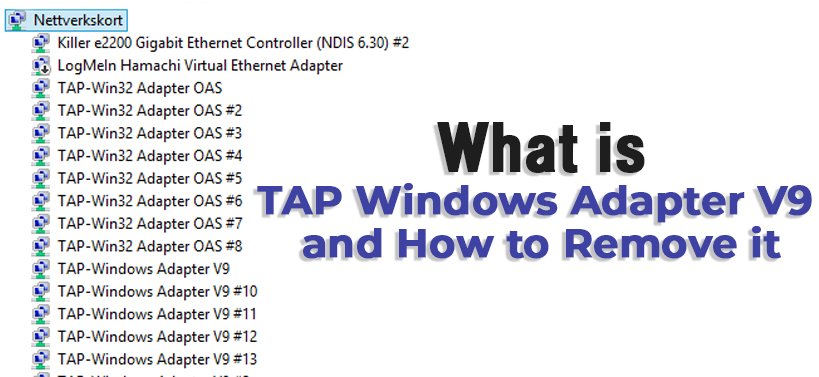
The Tap Windows Adapter v9 is a network driver that is necessary to establish the VPN connections. Basically, this adapter is a virtual network interface that gives the capability required by the many VPN clients to make a VPN connection.
The default directory path of the Windows Adapter V9 is as follows – “c:/Program Files/Tap-Windows”.
Although this adapter is useful for the VPN connection, even then some users said that their computer’s internet connections do not work when the Tap Windows Adapter is active. Here, you will get guidance on how to fix this problem.
About the Tap-Windows Adapter V9
The Tap Windows Adapter is a specific type of network driver that is installed into the by almost all the reliable VPN client applications. When you install a VPN client, then automatically this driver will be installed into the computer and appear within the ‘Device Manager’. In order to connect to the internet privately, most of the VPN clients utilize this adapter as an alias. On the Windows 10 Operating System, this adapter driver appears as the ‘NDIS 6 driver’.
Reasons for the Tap Windows 9.21.2 Error
Here, you will get all the reasons in regards to why this error can occur after all.
- If the Windows Tap Adapter has some kind of glitch, then there is a possibility for you get this issue.
- When both the VPN client software and the adapter starts to malfunction, even then this issue can crop up.
- If the Windows OS has got corrupted somehow, then you can even get this error also.
How can you rectify this Problem?
There will be multiple methods here, that will certainly help you to easily resolve the Tap-Windows 9.21.2 problem.
Set the connection of Windows Tap Adapter once Again
If the Tap Windows adapter is not functioning as it should, then the only solution is to reset the adapter. Doing this will simply reset the network function of the adapter. In order to do it, follow the steps below.
- First, click on the ‘Cortana’ logo to open the default search section of Windows OS. Inside that section, type in the text “network” and then from the results part choose the ‘Network Status’ option.
- As soon as you click on that option, then a new window with the ‘Status’ heading will come up.
- Inside that window, locate and choose the “Network and Sharing Center” link. This action will open another new window having the title ‘Network and Sharing Center’.
- Within that window, navigate to the left pane and then choose the ‘Change adapter settings’ link. This will open a new page with the name ‘Network Connections’.
- Within that page, locate the Tap Windows Adapter and right-click on it. Next, from the popup menu choose the ‘Disable’ option.
- Now, wait for a minute or so, then once again right-click on the same adapter and select the ‘Enable’ option.
- At last, once the reset process of the Windows Tap adapter is complete, next, check whether this issue reappears or not.
Remove the reliable VPN Client
If the reliable VPN client has some internal problem, then it can trigger the Tap Windows adapter v9 issue. Now, the best answer to resolve this issue is to delete the reliable VPN client from the computer. For that to happen, follow the steps below.
- First, tap on both the ‘Windows + R’ keys, to open a new ‘Run dialog box. Inside this dialog box, type ‘control panel’ and then click on the ‘OK’ button.
- As soon as you do that, then a new window having the name ‘Control Panel’ will come up. Within that window, locate and choose the ‘Programs’ category.
- Next, a new page will come up, in it, select the ‘Programs and Features’ option. At this moment, another new page will appear with a list full of all the installed applications within the computer.
- Now, from that list, locate and right-click on the reliable VPN client. After that, choose the ‘Uninstall’ option from the popup menu.
- If an uninstaller window for the reliable VPN client comes up, then follow the on-screen instructions and accordingly click the ‘Uninstall’ button. This action will remove the reliable VPN client from the computer.
- Finally, when the removal process is complete, next, restart the computer and see if this error is still there or not.
Uninstall the Tap Windows Adapter V9
If after the removal of the reliable VPN client does not solve this issue, then you can uninstall the Windows Tap Adapter. Here, you will get steps on how to uninstall the Tap-Windows Adapter from the computer.
- First, right-click the ‘Windows’ logo present on the taskbar. This will launch the ‘Options menu’.
- Next, from that menu, locate and choose the ‘Device Manager’ option. As soon as you click on that option, then a new window with a list full of all the devices and their respective drivers on the sub-list will come up.
- Inside this window, from the list locate the ‘Network adapters’ device category and double-click on it. This action will reveal all the network adapter drivers installed on a sub-list.
- From that sub-list, find the ‘Tap Windows 9.21.2’ driver and right-click on it. Now, from the popup menu that comes up, choose the ‘Uninstall device’ option.
- If you get a confirmation box, then click on the ‘Uninstall’ button.
- Lastly, wait for the removal process of the driver to get over and restart the machine to see if this problem is present or not.
Execute the Internet Connection Troubleshooter
The most effective way to get rid of this error is to run the Internet Connection Troubleshooter. Here are the steps on how can you do it is as follows.
- First, press both the keys ‘Windows + S’ together, to launch the default search area. Within the search area, enter the text ‘troubleshoot’ and then from the results page choose the ‘Troubleshoot’ option.
- As soon as you click on that option, then a new window having the name ‘Troubleshoot’ will come up.
- Within that window, find and choose the ‘Internet Connections’ option. Next, below that option, click on the ‘Run the troubleshooter’ button.
- Now, a new dialog box with the title ‘Internet Connections’ will appear.
- In it, choose the ‘Troubleshoot my connection to the internet’ link, so that the Windows OS will automatically search for any errors to the network connectivity.
- Once the checkup is complete, next, choose the correct option that the troubleshooter provides to fix the issue.
Set Windows 10 once Again
If all the methods provided here fail to resolve this problem, then as the last solution all you can do is reset the Windows 10 OS. Follow these steps below, in order to know how can you do it.
- First, click on the ‘Windows + I’ keys altogether. This will launch a new window with the title ‘Settings’.
- Inside that window, locate and choose the ‘Update & security’ category. Now, a new page will come up, in it, move to the left side and choose the ‘Recovery’ option.
- Next, go to the right pane of that page and then under the subheading ‘Reset this PC’ click on the ‘Get started’ button.
- As soon as you click on that button, then a new window having the name ‘Choose an option’ will come up.
- Inside that window, there are two options, out of which choose the one that says ‘Keep my files’ and then follow the information that comes up on the screen.
- Finally, once the ‘Reset’ button comes up, then select it to begin the reset process of the Windows OS.

 How to Solve GameStop Access Denied Error?
  Solutions of the Error: Origin Friend Request not Working
  Fixed: Dragon Age Inquisition Opens then Closes
  Guide to Enable On-Screen Keyboard on Windows 10 PC
  How to Perform Android File Transfer to Windows 10 PC?
  Install Snapchat for Windows 10 PC [Installation Guide]